Friday, July 8, 2011

Hey, Mr. Postman! Is there a letter for me?

This summer I promised myself I was going to get some projects done. We have had a rough year and I need a fresh start. I have a list a mile long of things that need to be updated or replaced or just plain changed!!! One of them was the mailbox......
Here's what the old mailbox looked like for six years. No flag and it was G.R.O.S.S!!! (My neighbor's isn't much better, eh? )
You can't tell from the pictures, but it was faded and scratched and very sad looking.
But now I have a shiny one with numbers and I love it!
So, here is how the "new to me" mailbox started out. I was given it about four years ago to use in primary. Never used it. It took up space for four years.....I know....pathetic! But! It is now checked off my list! And do you see that A.W.E.S.O.M.E sander sitting next to it? A birthday present from my neighbor. (I think it was a hint to stop borrowing his!)
Anyway, Noah and the animals needed to go. (Nice shot of the sander again, eh?)
I just sanded down the paint from the mailbox, primed it and spray painted it black.
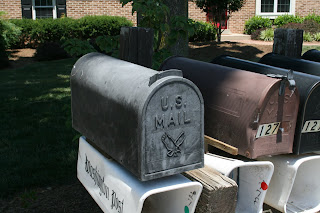
This one was precariously attached with nails and such and took about two seconds to remove. (The neighbors isn't even attached, so I guess ours wasn't as bad! We just lifted theirs up and removed ours and then put theirs back where it was!)
I printed off numbers I liked and traced them onto the mailbox and painted them white.
I love it! Such an easy and FREE upgrade! I had everything on hand and it looks so much better! I am sure the mailman appreciates it also!

Friday, May 13, 2011

Stake Women's Conference 2011

I was asked to do the decorations for the Stake Women's Conference again this year. They decided to call the luncheon "The Bluebird Cafe" and asked me to decorate around that theme.
For whatever reason, it was supposed to be very simple, but it turned out really hard and time consuming! Everything I planned had to be changed, but in the end, no one knew and the decorations turned out very simple and cute.
As you entered the building, we put tissue balls on the ceiling in the blue and white colors I chose......
Everyone loved it! Normally I don't decorate the entryway, but "plan B" provided that opportunity!
My dear friend, Kim, was in charge of the food. We talked for hours about cost effective ideas. We ended up with an awesome grilled chicken salad with choice of toppings....it was so yummy and healthy!

The fruit kabobs were a hit!
Sneak peek of the kitchen prep.....
And here are the decorations. The pictures, of course, do not do it justice. I was also trying to get pictures as the set up was going on, so there are some pictures, like this one, with the curtains open.....
I opted for very simple colors. Blue/Turquoise and white. Lots of white.
I used my chalkboard to make the menu and it turned out so cute!
Savannah and I went on many walks to find the perfect branches. My neighbors laughed and told me the idea was to take debris out of the yard, not bring it in! In the end, though, the branches were so awesome!
I spray painted some brown urns I already had and put blue birds all over the white branches.
I went through quite a bit of spray paint for this project!
The birds were so cute and realistic looking!
Each centerpiece was a wooden box with grass and a white branch and a bird.
I ransacked the industrial area for wooden pallets and had one of the men in the ward make me the wooden boxes. I tried to grow grass, but in the end, we used sod for the grass.
I wish the pictures did these justice. They were really cute and everyone raved about them. They were blown away by the idea. I got so many compliments!


Everything turned out so great and the food made the "Blue bird cafe" a huge success to a great conference!


My friend, Melissa, and I had the exact same color on, matching the entryway, so we had to get a picture together!

It was A LOT of work, but turned out great. I think I might retire, though, from decorations for awhile. I am tired!!!!

Sunday, March 6, 2011

What I've been doing the last few months.....

The Gala for our school is this coming weekend. Each class does a project and then the projects are auctioned off to make money for the school. When Xander was in fourth grade, I illustrated a cookbook and made cute aprons that all the kids signed. Since Garrett is in fourth grade, I volunteered to do the same thing......Each child submitted their favorite recipe and then I drew a caricature of them on that page.
My father-in-law was kind enough to embroider the apron tops for me.....
And my model is the coolest fourth grade Husky around! He's holding the cover of the cookbook, since they need pictures to post on the website to get the parents excited about the projects....
And, of course, the apron looks so much cooler with sunglasses on....
So, despite the fact that I haven't posted, it has not been from lack of creativity! I'm hoping the projects will fetch a good price and make some money for the school!

Monday, January 10, 2011

Showing our team spirit

The BCS National Championship Game involved the University of Oregon and since we L.O.V.E. Oregon, we had to show our team spirit. We decided to make t-shirts to show our support. They turned out so cute and the kids love them!
Freezer paper is amazing! You can iron it onto fabric and then it peels right off without residue. You find it at the grocery store. And it is easy to cut!
First, you draw or trace your design onto the non-shiny side of the freezer paper. It is like a stencil, so remember that more intricate designs will be harder.
Then you can use an exacto knife or scissors to cut the design out. Remember to save the pieces to make the design complete.
Xander did a backward stencil......
Everyone else did a regular stencil.
The little pieces are very important when ironing the paper onto the shirt.
Like Garrett's shirt....it was very labor intensive, but look how awesome it looks even before it was painted!
You also have to remember to put the pieces in, like the duck's eyes and the diamonds on the crown.


Then you iron on the paper, shiny side down, onto the shirt or other fabric.
So, after you iron the stencil, then you paint. Be careful not to paint too much on the freezer paper, as it will separate from the fabric. We used fabric paint and then let it dry overnight.
I always iron then t-shirts to heat set the paint.
And here are the results! Xander did his all on his own.....awesome!
Garrett chose vintage Duck gear. I think I did a great job on the duck! It was hard to cut out all those pieces!
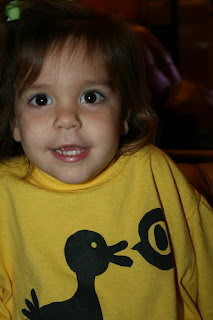
Cute little Savannah duck.....
The diva duck cheerleader!
They all turned out so cute and the kids LOVED them!
Go OREGON DUCKS!